11
Jul 11
Google’s Patent Applications: How to Examine Them Yourself
Google and Bing are in an arms race. The two weapons they are deploying are datacenters and Ph.D.’s, which are substitutable for each other. If a Ph.D. comes out with a way to store or index data that is 5% more efficient, this can result in hundreds of *millions* of dollars of savings in datacenter costs.
Often these companies will file patents if they have some really good ideas, or they will file them just to have some patents in a particular area they are worried they may eventually face a lawsuit in. For instance, if Facebook were to sue Google over some social search patent, it would behoove Google to have some unrelated social networking patents they could countersue over and force a settlement. When large companies go through this exercise, they usually end up cross-licensing a whole slew of patents to each other, in essence agreeing not to bother each other for awhile and giving each other freedom of action in some areas.
For SEO purposes, issued patents and patent applications can be a great source of insight into search engine’s algorithms, and can suggest strategies and tactics that you might pursue to get an edge in the ranking game. As Matt Cutts often says, just because Google files a patent or mentions something in a patent, it doesn’t mean they are doing things that way. However, without evidence to the contrary, it’s reasonable for SEOs to assume they are. The reason for this is, the patent process requires that the inventor disclose the “best mode” in the application, i.e. the best way to implement the invention. Usually this best way coincides with how it’s actually being used – why would you ever implement something using a “worse than best” approach?
For the patent-uninitiated, Bill Slawski over at SEO By the Sea does a *fantastic* job of monitoring Google’s patents and dissecting them so they are a little more understandable. I highly recommend following Bill’s work. However, Google files so many of these, I believe it’s impossible for one person to keep on top of them all. In fact, a full-time competitive analyst employed by Bing or Yahoo would be hard-pressed to keep track of them all in a spreadsheet, let alone someone blogging on the topic on the side (trust me, I speak from experience).
In this posting I am going to show you, step-by-step, how to research and examine Google’s patents and patent applications yourself. This is a fun and useful exercise probably best done on a quarterly basis or so. In the process you’ll learn a little about the patent process and how it works. Don’t be intimidated, anyone can do it, it’s free, and (rather shockingly considering it’s all provided by a government created system), it’s surprisingly easy.
Step 1 – Start with an inventor’s name, a concept, or Google’s name
We’ll assume here that we’re starting by looking for patents under Matt Cutts’ name. Later we’ll run over how to search in other ways and what strategies and approaches seem to work best.
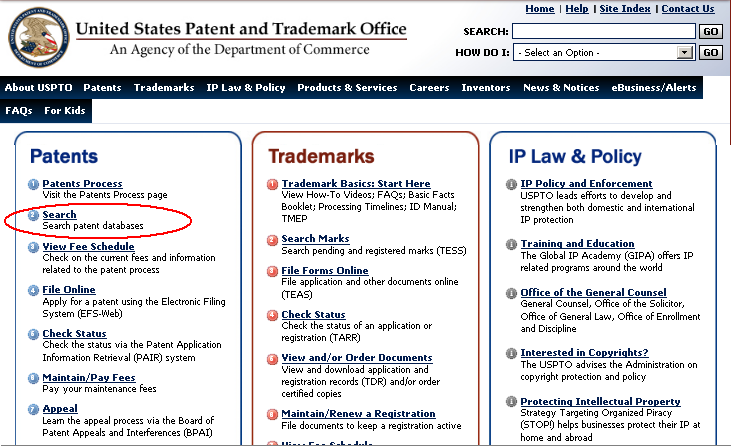
1A. Go to the US Patent Office’s website at http://www.uspto.gov/
It should look like the initial picture at the top of this article.
1B. Click on “Search”
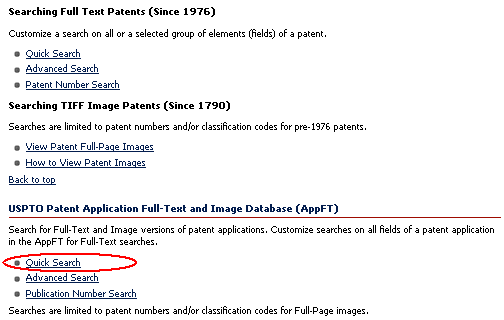
1C. You are then given the option of searching for issued patents (full-text patents), or applications. In our example, we’ll search applications:
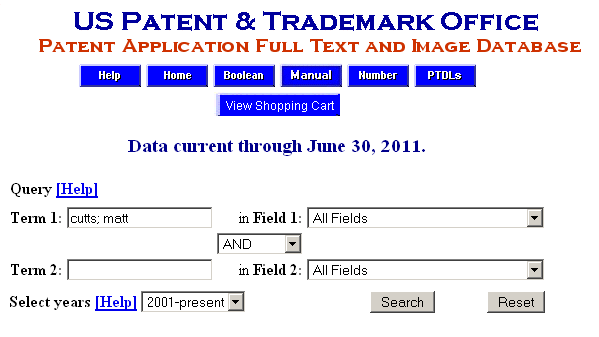
1D. Now you will see a search interface that lets you select various fields such as Inventory Name, Assignee, and so on. The Assignee is usually the company employing the Inventor(s) – during the process the company’s lawyers typically file an “assignment” document where the inventors turn over the rights to the invention – as their employment agreements typically specify they will do for any inventions created on company time. So we could select “Assignee” and type “google” in the first field, but we would then only see applications that have been assigned. In this case, let’s search on Matt Cutts’ name. The format to use is [last name, semicolon, space, first name], so “cutts, matt” or “cutts, matthew”. It turns out that Matt’s name on his applications is “Cutts; Matt” so [cutts; matt] works fine:
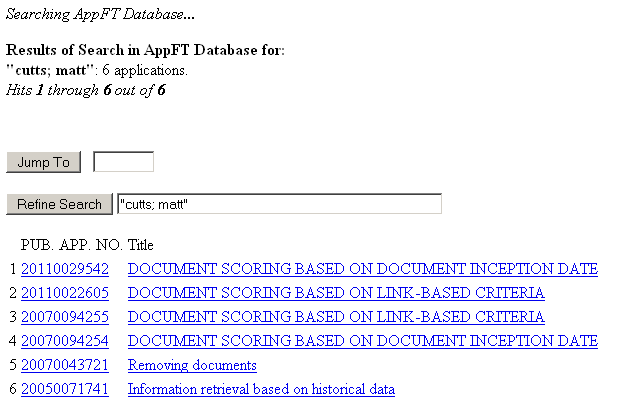
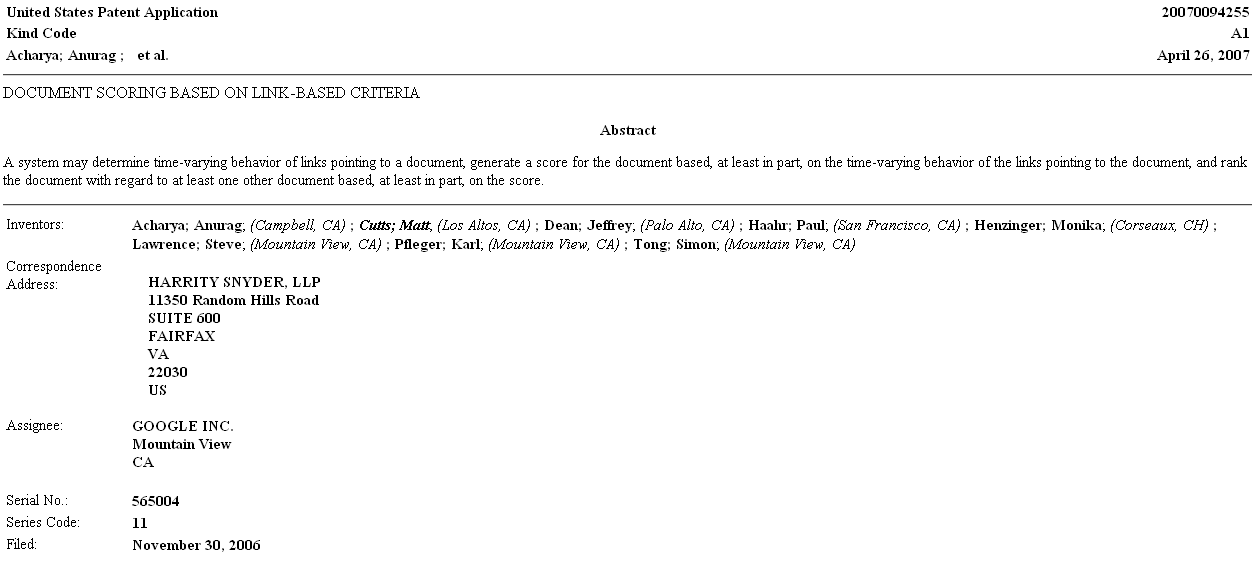
1E. The system then presents us with a list of patent applications where Matt Cutts is listed as an inventor. In our case, we’ll select the third one in the list, with Publication Number 20070094254. Applications have numbers assigned to them when they are submitted to the USPTO, but they aren’t published in the system for about a year; when they are published, they are given a publication number. As you may have guessed this number starts with the year, then they pretty much go in the order that the USPTO published them throughout the year:
1F. You are now looking at the text of the application. Congratulations!
Step 2 – How to interpret what you’re looking at
A patent application has a number of parts, including some header fields (such as title, inventors, dates, and assignee), an abstract, background (general detail on the industry and the problem space), a specification (detailed discussion of the invention), claims (the exact statement that defines what the invention being claimed is), and drawings (referred to by the specification).
Usually I proceed in the following fashion:
2A. Read the claims. Often the claims refer to terms defined in the background or specification though, so you may have to refer back to those.
2B. Read the specification. Look for the “best mode”, usually indicated by terms such as “some embodiments may include”, or “one embodiment”, and so on. The “embodiments” are really just different possible implementations of the invention. Usually the one that someone spends the most time explaining is the “best mode” one, but sometimes it might be hidden by throwing it into a short half-sentence reference. If you see a short reference like “some embodiments of the invention may include GPS guidance for accurate delivery of the warhead to the bunker location”, that seems to you like the absolute best way *you* would implement the invention, then that is a good candidate for the “best mode”. Famously, there was a short reference to domain registration length on one of Google’s patent applications, which has led many, myself included, to believe that longer registration lengths help in your rankings (Matt Cutts’ vague denials to the contrary). Often the specification has tiny worthwhile nuggets like this, so it helps to read the whole, (albeit boring) thing.
2C. I usually read the background last, in case there’s something I’m missing.
Step 3 – What is a Claim?
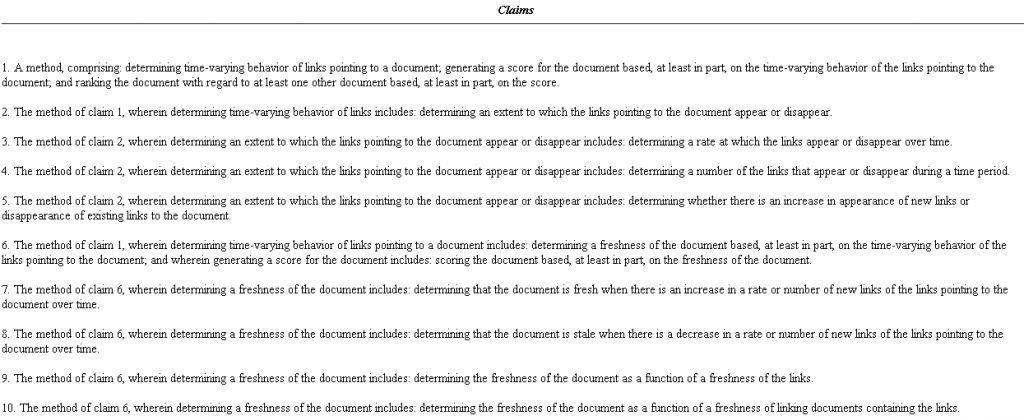
The claims, usually from 1-20 or so, possibly more if the filer paid extra, detail exactly what the patent is for. The way these are set up is, claim 1 usually is the core of the invention (called an “independent” claim), then claim 2 will essentially say “claim 1, except when I said widget, let’s expand widget to be something large and more detailed”. You will usually have a long string of dependent claims following an independent claim. There may also be an independent claim partway through again, with its own string of dependent claims.
A smart patent attorney will actually bury the real invention they are trying to patent by putting the key stuff all the way down in claim 5, then have that depend on claim 4, then have claim 4 depend on 3, all the way back to 1, then claim 1 usually will claim some idea so ridiculously broad that it seems preposterous someone would get a patent on it.
This is sort of a ringed-defense, like a bunch of moats, and gives the patent attorneys fallback positions. If the patent examiner objects that the first claim is too broad, or has “prior art” (i.e. shows evidence that someone else thought of it first), then you’re allowed to re-file the claims and collapse them together – putting, say, the essential wordings of claims 2 and 3 back into claim 1.
So it gives the patent attorneys an option to keep the patent alive and tweak it until it’s acceptable if it’s rejected, and having you fold some of your claims back into their independent precursors can actually help the patent examiner save face if there’s a big argument during the back-and-forth process with them. The examiner wants to appear tough, but not unreasonable, and leaving yourself an exit strategy ahead of time can be helpful to both parties achieve some balance in the process.
In the case of this particular application, we can see one independent claim and a bunch of dependent claims:
Step 4 – Looking at Images
You may have noticed at the top of the patent there is an “Images” button:
This allows you to look at scans of the patent application, including scans of the images (the figures you see referred to frequently in the specification). I normally don’t bother with this, but if you want to look at them, you need to install a TIF viewer – Quicktime works fine, but I prefer Alternatiff, which is a free browser plug-in.
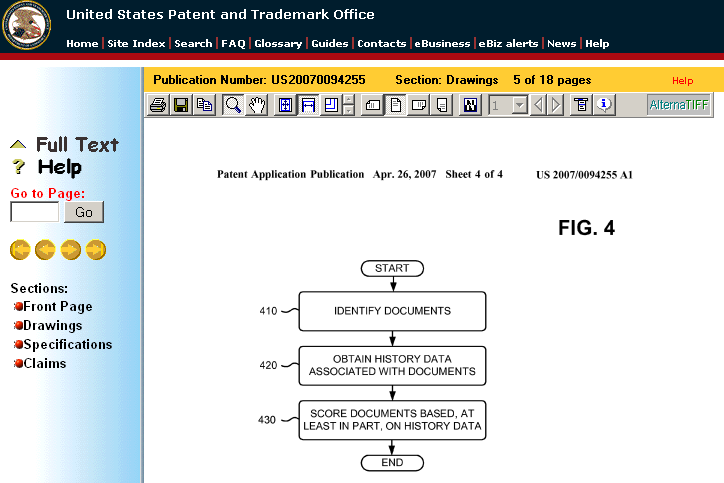
In this case, if you poke around the “Images” section, or just move forward through the document with the right and left buttons, you can see the “Figure 4” that the specification refers to, which is a series of steps. Usually you will see a pile of essentially useless figures that depict computer systems with memory and hard drive components and so on; ignore most of these as they are only included by patent attorneys to satisfy certain technical requirements necessary if you want to get a software patent – many are boilerplate. But Figure 4 in this case does have something to do with this specific invention:
Step 5 – Following the Trail of Inventors to Other Applications
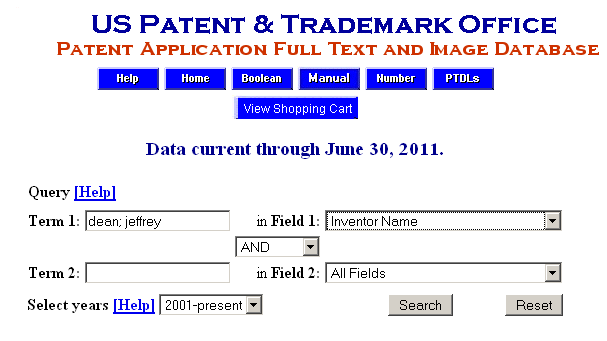
If someone is an inventor on one patent application, they might be an inventor on others. One great way to uncover other applications is to go back to step 1D above, but instead of entering Matt Cutt’s name in, just try entering other co-inventors of the patent application we just examined. Jeffrey Dean is a pretty prolific guy listed on that one, so try entering [dean; jeffrey]<–(don’t forget the space after the semicolon, also last name, first name!) like the screenshot below, and you’ll get a pretty substantial list:
This is a great technique, because often Google does not have the inventors “assign” the application over to Google until late in the process, so its name does not appear under “Assignee”. There are many of these “stealthy” patents out there. If you see a ton of people from Mountain View and Palo Alto on a search patent, and the law firm is one of the 2 or 3 that Google uses, check out the people on LinkedIn and you’ll usually see they work for Google (sometimes Yahoo patents come up in this way as well though). Also don’t forget that people change companies; part of the Bing/Yahoo agreement involved some Yahoo technology people moving to Bing, so look at the filing date and LinkedIn and try to figure out who was where, and when, in order to determine what company’s filing you’re looking at.
Step 6 – Searching for Applications Assigned to Google
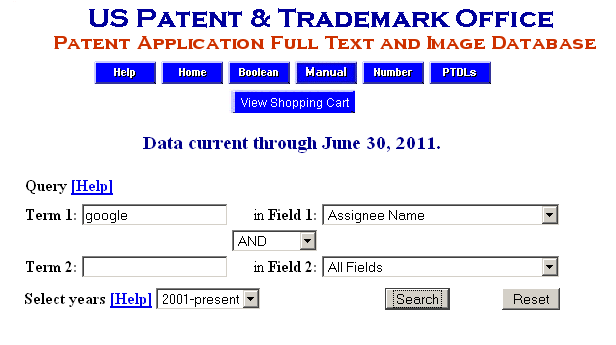
This just involves selecting the “Assignee” field from the popup at the right and putting [google] into the search field. Pretty simple, but again, it won’t catch applications that haven’t been “assigned” yet. But this can be a quick and easy query to run, even just to get started in the process:
Step 7 – Finding out if an Application has “Issued” (or been “Granted”)
For this, simply go to step 1B and instead of search applications, search “Full Text Patents”. I usually just copy the title of any application in question and then paste it into the search field, with the default “Any Field” turned on. This might bring up other patents with similar names, or patents that refer to the original, but the earliest dated one is usually the one I’m looking for. You can search on Publication number as well if you prefer, that’s more exact.
Step 8 – Reading all the Correspondence Between the Attorneys and the USPTO
In most cases you won’t bother doing this, but if you want to learn about the patent process, it’s a great way to get a feel for how these work. By law, every document that goes back and forth between the Patent and Trademark Office and the Patent Attorneys must be scanned and made available through the “PAIR” system. There is a private version (presumably it includes any of those stealthy applications I mentioned) and a public one. To access the public one, just:
8A. Go to uspto.gov
8B. Select “Check Status”
8C. Select “Public PAIR”
8D. Enter the Publication Number of the application you want to review correspondence on, then respond to the Captcha.
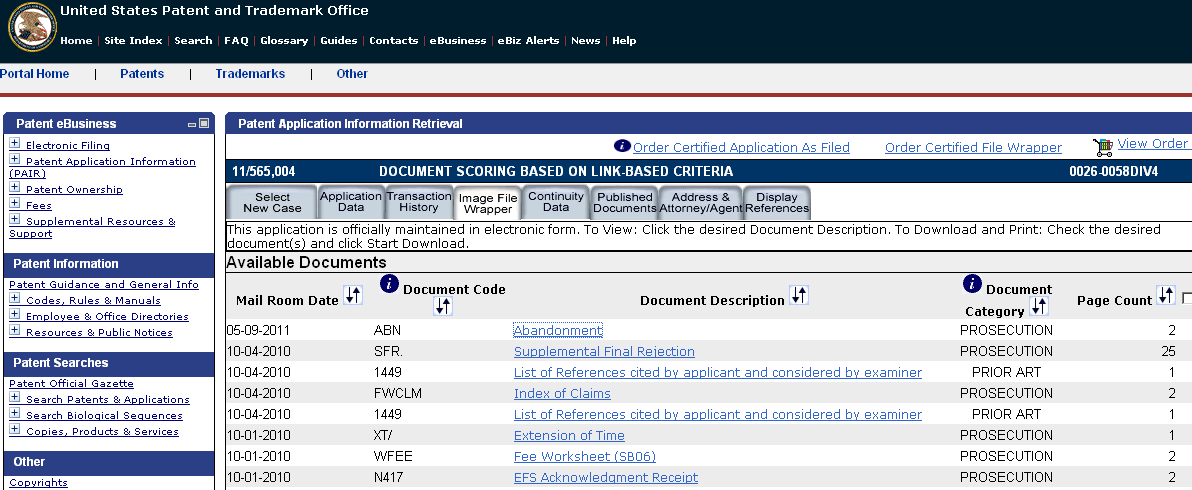
You’ll see a separate GUI come up with various tabs – the documents you want to look at are in the “Images” tab. I believe viewing them requires TIF support in your browser – if you don’t have it, go to Step 4 above for instructions:
If you open up a number of these documents, you can get a feel for the process (early ones are at the bottom, newer ones at the top). Many patents go through a process of an initial rejection by the examiner (usually for something like prior art concerns – i.e. the examiner feels someone else thought of it first), a response by the patent attorneys to this, maybe a second round, sometimes a final rejection (which isn’t necessarily final), and eventually it either issues or is abandoned.
In the case of this application it looks like it was abandoned – either intentionally, through missing a date, or maybe there was a “continuation” (i.e. a fork) of the application into *another* application which was modified but is now being kept alive and moved along.
Reading the arguments back and forth is sometimes interesting, sometimes tedious, and often resembles an old Steve Martin joke. The examiner states that there is prior art in some obscure public document no one ever heard of, from a completely unrelated field, (let’s call it the “Kinsley Manual”), to which the attorneys respond “The Kinsley Manual says ‘sprocket’, not ‘socket'”. You can imagine the other exciting action, even more exciting than watching paint dry, that goes on in these paper trails.
But reading through a few of these trails can be very instructive on the process and might be helpful to you some day if you’re involved in a patent filing yourself. If you’re really curious about all of this, Nolo Press publishes a great book called “Patent it Yourself” which explains the process in great detail.
Conclusion
You now have everything at your disposal to pore through Google’s patents looking for hidden nuggets that are screaming to be exploited via some way-out affiliate marketing strategy via SEO. Have fun, guzzle some Dr. Pepper while you’re poring over what you’ve found, and if you come across anything *really* good….of course, don’t tell *anyone* (how un-Rand-Fishkin-like of him you may well say ;-). If you do, it will become so well-known Google will inevitably change things and ruin it for you, so for heaven’s sake, keep anything really good you discover on the DL…



Excellent discussion. I use the exact same process myself when a client needs a quick rundown on what a competitor is up to.
For those that find this a bit daunting: feel free to contact your friendly neighborhood registered patent agent who would be more than happy to walk you through it.
A buddy of mine has been studying to take the (patent bar is it called?) to become an agent, but they changed the requirements just a few weeks before he was scheduled to take it, so he’s off studying again for it all over again…you guys are definitely a great resource to turn to, no question.